![]()
|
|
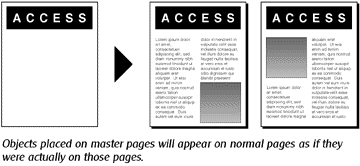
Every page is based on a master page in PageStream. Master pages define the size and orientation of pages, the placement of guides and the spacing of the grid. Objects placed on a master page will be visible on all pages based on that master page.
Creating Master Pages |
When you create a new document, you automatically create a master page named Default Master Page. All pages in the document will default to this master page. You can create more master pages at any time. You may wish to have other master pages so that you can place different objects on each one, or you may wish to have master pages with different guides and grid settings. You may even want to mix page sizes in a document.
Master pages determine whether a page is single-sided or double-sided. Double-sided master pages have left and right sides so that you can use different guides, grid spacing and objects on each side. Pages based on double-sided master pages may be joined together automatically as facing pages.
1. Choose Show Document Palette from the Window menu.
The Document palette will appear.
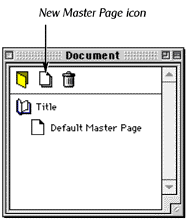
2. Add the master page.
To add a master page at the document level, drag the master page icon in the palette onto the document icon. To add a master page in a chapter, drag the master page icon onto a chapter icon. The document or chapter icon will be highlighted when you have correctly positioned the New Master Page icon. When you release the mouse button, the Master Page Setup dialog box will appear to set the values for the new master page.
3. Click OK.
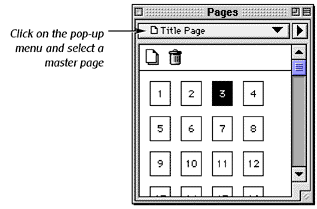
To change the master page on which a page is based: Choose Show Page Palette from the Window menu. The Page palette will appear. Select the page icon in the palette and then choose a master page name from the Master Page pop-up menu.
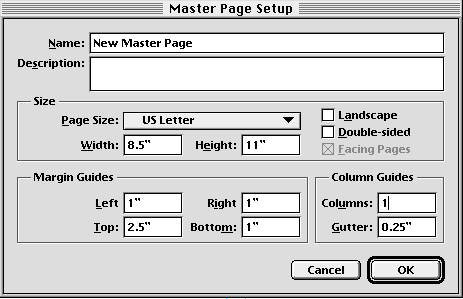
To change the settings for the visible page's master page: Choose Master Page Setup from the Layout menu. The Master Page Setup dialog box will appear. Set the master page's values and click OK.
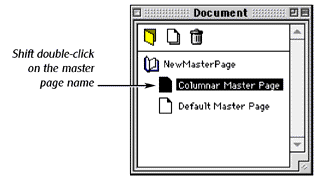
To change the settings for any master page: Choose Show Document Palette from the Window menu. The Document palette will appear. Shift double-click the master page name. The Master Page Setup dialog box will appear. Set the master page's values and click OK.
You can create, modify and delete objects on master pages just like objects on normal pages in your document. To edit a master page's objects, you must display the master page in the document window.
![]()
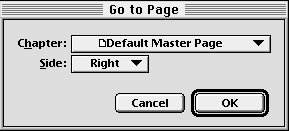
To display a master page in the document window: Click the
Go to Page button. The Go to Page dialog box will appear. Choose
a master page from the Chapter pop-up menu. Choose Left, Center
or Right from the Side pop-up menu for double-sided master pages.
Click OK.
Master page objects can be displayed on top of or below objects on normal pages. You can also hide master page objects for specific pages in case you want to setup a page differently than the master page on which it is based. Regardless of how the master page objects are shown on normal pages, they are not editable on normal pages; clicking on them will have no effect.
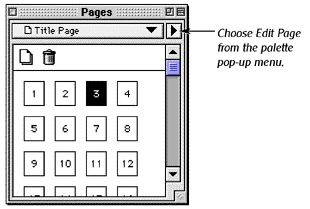
1. Choose Show Page Palette from the Window menu.
The Page palette will appear.
2. Select the icon of the page to change.
3. Choose Edit Page from the palette menu.
The Page Setup dialog box will appear.
Choose In Front, In Back or Do Not Show from the Show Objects pop-up menu.
4. Click OK.
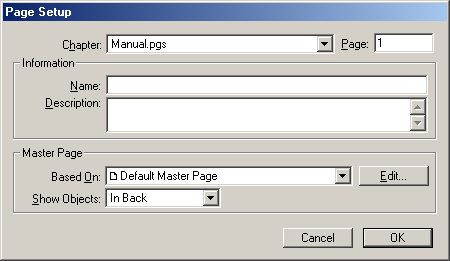
1. Choose Page Setup from the Layout menu.
The Page Setup dialog box will appear.
The current page's chapter and number will be shown in the Chapter pop-up menu and Page string. A new chapter and page number may be select, and the Master Page group attributes may be applied to a range of pages by entering the start and stop page number separated by a dash (-). To set the attributes from a specific page and all pages after that page, enter the starting page number followed a single dash (-).
Choose In Front, In Back or Do Not Show from the Show Objects pop-up menu.
2. Click OK.
|
|